Late last spring, my husband Dave and I decided we wanted an outdoor pizza oven. Throughout June, we did a fair amount of research, online and locally, and found many wonderful options, but all of them were way, way out of our price range. We hadn't even formulated a budget for The Oven at that point, but we knew that we weren't willing to spend $7K-15K just to cook pizza outside.
Dave originally envisioned a brick oven, and he thought maybe we could build that ourselves; we're a very Lego family, how hard could it be? He did some more research, and it turns out: very, very hard. Something about masonry skills, and us not having them.
Eventually, we came across a building technology so simple that even a caveman could do it (literally). Ten thousand years ago, people were building all kinds of things out of adobe (clay + sand) and insulating with cob (clay + sand + straw).
We were interested in working with these materials, but it sounded disconcertingly primitive. Plus, we really had no idea how to work with it, and it's not like we could call the Stone Age helpdesk for advice on what they'd done. So we did what we always do: we thought about it for awhile.
2 - Research
We began looking for workshops on cob ovens -- thinking we'd probably have to travel to do it, but maybe we could plan a vacation around it? Then, in early July, our friend Tim emailed us about a cob-oven building workshop to be held at a local farm later that month! I had an office commitment I couldn't miss, but Dave signed up for the workshop, which was held on July 21 & 22 (2009) at New Village Farm in Shelburne, VT. We hadn't heard of them until our buddy Tim emailed us about the workshop, but we're tuned in to New Village now -- they're very into educating families about farming, particularly biodynamic agriculture.
 The workshop was led by builder and baker Alden Cadwell, who guided about 20 participants through the process of actually building an oven in two days.
Dave absolutely raved about the workshop -- he was so pleased he made it a point to drive to my office -- still covered in muddy glory -- that afternoon!
We both wanted to do more research, and we were kind of surprised that we couldn't find a "how-to" guide online, so we decided to rustle up some books. (That's also when I decided I would be creating this website.)
The following books were most helpful and/or inspirational to us:
Building With Cob: A Step-by-step Guide
The Hand-Sculpted House: A Practical and Philosophical Guide to Building a Cob Cottage: The Real Goods Solar Living Book
The Cob Builders Handbook: You Can Hand-Sculpt Your Own Home
3 - Materials Used
I'll be reviewing the step-by-step details in subsequent posts, but before we began, we made sure that we had all of the "ingredients" we needed for this recipe. We were fairly obsessive about wanting to use cheap local resources (where local mostly = "our yard") or recycled material. As it turns out, it would've been pretty cheap even if we'd bought all the materials new (which is a weird way to refer to rocks and clay and straw in any event).
- clay (6 five-gallon buckets of clay dug up from our yard -- it was only about 1 foot down)
- sand (4 bags of play sand, purchased at the hardware store because when we tried to use sandy dirt from our yard, little rocky impurities shredded our tender widdle feet during the stomp)
- straw (1 bale, purchased from a local farm store)
- gravel (8 painful wheelbarrows full, which we scraped from a underused section of our long gravel driveway)
- rocks (salvaged from a construction company's fireplace renovation)
- wine bottles (6 bottles from our recycling bin)
- tarp (10" x 20", used to stomp mix of clay and sand)
- water from our garden hose (this could've been in a five-gallon bucket, it's just to moisten the clay/sand mix during the stomp)
4 - Selecting the Site
We have a big yard, so we had quite a bit of choice in selecting the right site for our oven. Fortunately, we realized early on that the site selection had to be a PERMANENT decision; you can't really change your mind after the fact. This oven does not move!
 (Our pizza oven won't be able to come with us when we downsize someday, but we haven't invested much money in it. True, we invested about a week of our time and energy, but we had a blast doing it, and we learned a lot, so we'll build an even better one when we move to Next House.)
Things we took into consideration in choosing a site:
The site we eventually chose is


Things we took into consideration in choosing a site:
- Distance from the house itself: originally, we were thinking about building this on our back deck, but we decided that having a giant fire right near our wooden abode was...dumb. We decided that we wanted it as far as possible from the house -- too far for the wind to carry sparks, for example -- while still being as conveniently close to the house (kitchen) as possible, since we assemble the pizzas indoors.
- Windbreak: The fire will be mostly protected in its little cave of hard adobe (clay + sand) during cooking, but the fire gets started/built on a little ledge on the lip of the oven, and that is exposed to wind. Plus, the firetender (cook) is going to be standing out here for at least half an hour, and the wind can be uncomfortably cold for 75% of the year in Vermont.
- Level ground: I guess you could build on non-level ground if you had to, but it'd be a lot harder to figure out how to stack the rocks that form the base of the oven
- Diggable to 5 feet: Some of our yard is pure rock ledge -- most New England homes have a basement, but ours does not because we're built on top a huge underground boulder. My husband and son probably would have been up for dynamiting a hole in the earth, but I was not, and fortunately, we found plenty of spots that our shovel could penetrate to a depth of about 5 feet.
The site we eventually chose is

- About 20 yards from the house and deck
- On a flat patch of grass
- Surrounded by 3 evergreens (for windbreak)
- Not a big rock
5 - Sketching & Choosing How Big to Make the Oven
My husband Dave is a man of many talents, including creating 3D models of stuff using Google SketchUp (click link to download for free!). He's used it to create the model for our kitchen counter project, our hoophouse, and now the outdoor oven. This model was really helpful in visualizing what we were doing, and also helped us think about how big to make the oven.
 We decided that we wanted to be able to make one medium pizza at a time. We eat a lot of pizza, but we like variety, so lots of smallish pizzas is good! (More about this later, but note that the pizzas cook really quickly -- about 2 minutes each -- so it's reasonably easy to feed a crowd; you just keep the pizzas coming out every few minutes.)
We also wanted to be able to use the oven to bake bread, and we decided a two-loaf capacity was right for us (note that bread and pizza are not cooked at the same time).
The inside of the oven (the cooking area) is dome-shaped, so we needed to know the diameter of the smallest circle that could contain a ring of fire + a medium pizza (or a ring of hot coals + 2 bread loaves). We settled on a 45" diameter, then cut it out in cardboard and played with it for a few days...put it on the ground at the site we'd chosen, put pizza crusts on it to try it out, etc.
We were worried that it was a little too small, but the big advantage to keeping the oven as small as possible is that smaller = much better in terms of heat efficiency and consistency. As it turns out, we typically use about 2 logs* on any given pizza night (that will make about 8 medium pizzas and then, when the oven cools off a bit, two loaves of bread). We're REALLY pleased with the size we chose.
Once you know the size of that circle, you can estimate the depth and (to some extent) the height of the cooking area and surrounding mass. (The overall height of the oven is affected by the rock pillar you're about to build; you'll want the base of the cooking area to be about waist-high.)
*The logs are split into kindling, and Dave tends the fire for about 30 minutes, at which point the temp in the oven is about 700 degrees, and the mass (the dried adobe) has absorbed that heat pretty evenly. A bigger oven would require more wood and would be harder and time-consuming to come to temperature and stay there without forming hot and cold spots.
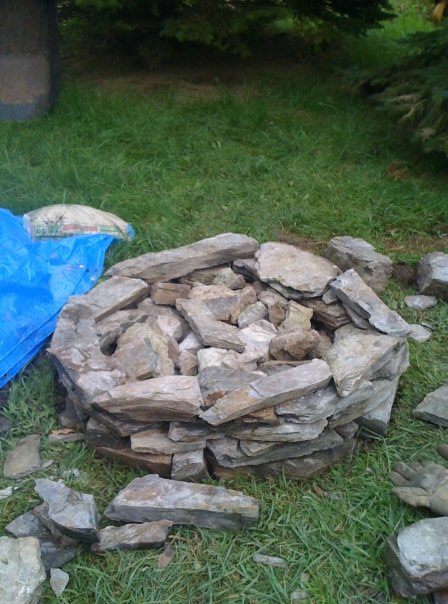
6 - Laying the Groundwork (literally!)
The first actual physical effort was to dig a hole about 5 feet deep, about 3 feet in diameter. I can't believe I forgot to take a picture before we filled it with gravel, but here's our hole after the fact:

The tarp is covering a mound of dirt and clay, which is what used to be inside the hole! We covered the pile because the clay was getting baked in the sun, and we needed to keep it moist and pliable so we could work with it.
By the way, it doesn't look like it, but that is a LOT of gravel.

The tarp is covering a mound of dirt and clay, which is what used to be inside the hole! We covered the pile because the clay was getting baked in the sun, and we needed to keep it moist and pliable so we could work with it.
By the way, it doesn't look like it, but that is a LOT of gravel.
7 - Building the Stone Base
Have I mentioned how handy Dave is?
 He is a code monkey by day, and has never built anything of stone before, but he started channeling his distant forefathers (Italian stoneworkers, we imagine) as he began to construct the ring to form the stone base of the oven.

We tried to use the best looking rocks to build the stone ring. As the ring grew taller, we filled it up with crappier rocks and broken concrete. There's no mortar here -- filling the ring as we went along resulted in a very stable base. We also continually used a level (an app on Dave's iPhone, actually) to make sure we weren't building the Leaning Tower of Pizza (ha-ha, get it?).
 The vertical yardstick is so that we'd know when to stop building up the base. You'll want the cooking base (and the lip of the oven) to be about waist-height, so the stone base is built up until it's about six inches below your waist, which leaves room for about four inches of insulating mass and about one inch of firebrick on top of the stone base.

Lest you think I was standing idly by while Dave toiled, please know that I also carefully selected rocks and placed them into cozy niches to form the ring. Every time I placed a stone as I saw fit, Dave would look at it thoughtfully, and then quietly move it somewhere else. I knew that the clay would be my metier, so I gave in gracefully, but I warned him that I was going to be the one in charge of molding the clay shape of the oven itself, and that just might turn out to be a sparkly unicorn with wings.

We tried to use the best looking rocks to build the stone ring. As the ring grew taller, we filled it up with crappier rocks and broken concrete. There's no mortar here -- filling the ring as we went along resulted in a very stable base. We also continually used a level (an app on Dave's iPhone, actually) to make sure we weren't building the Leaning Tower of Pizza (ha-ha, get it?).


Lest you think I was standing idly by while Dave toiled, please know that I also carefully selected rocks and placed them into cozy niches to form the ring. Every time I placed a stone as I saw fit, Dave would look at it thoughtfully, and then quietly move it somewhere else. I knew that the clay would be my metier, so I gave in gracefully, but I warned him that I was going to be the one in charge of molding the clay shape of the oven itself, and that just might turn out to be a sparkly unicorn with wings.
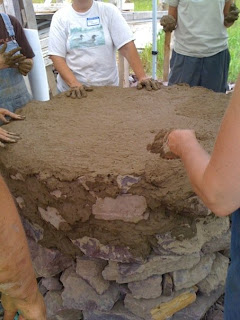
8 - Yay! Clay!
Finally, it was time to get dirty! Adobe is a software company mix of clay and sand, and you will be wallowing in it while you build your oven.
We already had some clay (it came out of the hole we dug and then filled with gravel). We lay a 10 x 20 tarp on the grass near the oven, and spread a five gallon bucket of clay on top of it. Then we sprinkled the clay with a little water from the hose, and started stomping.

It makes a huge mess, of course. It's fun, too, if you're into that kind of thing (and you must be, because why would you be reading this otherwise?). Also, if you're as out of shape as I am, it's exhausting and causes your legs to strongly consider seceding from the union.
Once the moistened clay is somewhat mushy, rather than mostly clods, it's time to add the sand. This time, instead of stomping directly on the mix, fold the tarp so it makes an envelope (with the mix inside), and then stomp on the tarp. Stomp for awhile, then open the tarp and admire your work. There will still be dry sand visible; try to distribute it evenly over the clay and fold the tarp over again. Stomp some more. Repeat until you don't see any more dry sand.
Congratulations -- you have adobe! (Take ibuprofen for your aching legs.)
Spread this batch of adobe across the top of the rock base. (When you built the rock base, you stopped adding the center fill a few inches before the top of the ring. Slap the adobe in there, and make the top as flat and smooth and level as you can.

This part of the process will take shockingly little time compared to how long it took to mix the adobe.
9 - The Insulation Layer and Fire Bricks
Build a 4" tall round slab of adobe on top of the stone base; this round slab will serve as the foundation for the oven itself. The diameter of the stone base is 48", so the foundation slab has a diameter of 48" too.
Next, build a ring of adobe on top of the slab. The diameter of the ring (measured from its outside edge) is 40", which means there's a 4" lip of the foundation exposed all the way around the ring. The walls of the ring should be 4" wide and 4" tall.
Fill the ring with empty wine or beer bottles from your recycling bin. The bottles should be laid on their sides, with the necks in the center and the bottom of the bottles against the circumference of the ring. We found it best to use 1.5 liter wine bottles; each is about 4" tall when laid on its side, so it fills the 4" tall ring quite efficiently.
 This bottle-filled ring will act as an insulating layer below the oven floor. We don't actually know what happens to the glass bottles (do they break? do they melt?) -- but it doesn't matter. The purpose of the glass bottles is to form pockets of air between the oven floor and the stone base; when the adobe in the insulating layer dries, the air pockets will remain, regardless of what happens to the glass.
The air pockets form an energy barrier -- this insulating layer prevents the stone base from stealing heat from the oven.
Finally, it's time to cap the insulating area with -- you guessed it -- another layer of adobe, this one about 2" thick, so the insulating layer is about 6" tall.
Next, add the firebricks like this:

Next, build a ring of adobe on top of the slab. The diameter of the ring (measured from its outside edge) is 40", which means there's a 4" lip of the foundation exposed all the way around the ring. The walls of the ring should be 4" wide and 4" tall.
Fill the ring with empty wine or beer bottles from your recycling bin. The bottles should be laid on their sides, with the necks in the center and the bottom of the bottles against the circumference of the ring. We found it best to use 1.5 liter wine bottles; each is about 4" tall when laid on its side, so it fills the 4" tall ring quite efficiently.

The air pockets form an energy barrier -- this insulating layer prevents the stone base from stealing heat from the oven.
Finally, it's time to cap the insulating area with -- you guessed it -- another layer of adobe, this one about 2" thick, so the insulating layer is about 6" tall.
Next, add the firebricks like this:

10 - The Sand Dome
If you like building sand castles, you'll love this part! We're building a sand dome that forms the shape of the inside of the oven. After the adobe dries a little, we'll dig out the sand and viola! there's a hollow little cave for fire and food.
We want the cooking area of the oven to be 14" tall, so we cut a strip of wood that long and stuck it in a small heap of slightly moist sand on top of the firebricks, then started building the dome to the height of the stick.

Keep the sand as dry as possible but moist enough to be molded into the dome shape. The base circumference of dome should be the biggest circle that fits within the confines of the firebrick layer.

Now cover the sand dome with a layer of moistened newspaper. Later, when it's time to hollow out the over, the newspaper layer will help you know when you've removed all the sand -- at which point you'll stop digging so you don't weaken the still-drying adobe walls.
11 - The Adobe Dome
Next, we put a layer of adobe on top of the newspaper-covered sand dome. The walls of the oven want to be 3" thick, with the clay as uniformly distributed as possible.

What worked best for us was to grab hunks* of adobe (about the size of a brick and roughly 3" thick) and put a layer of slightly curved hunks all the way around the base of the dome, taking care to smush each hunk into its neighboring hunks, so there aren't any seams visible between hunks.
Then we stacked another layer of curved hunks on top of the first (now seamless) layer of curved hunks, building all the way around the circumference of the dome again. Again, we smushed the hunks together as we added them to the dome so there weren't any visible seams between hunks or layers. We repeated this process until we put a roundish hunk at the very top of the oven and smushed it into place, too.
Note that three firebricks will be protruding from the adobe-covered dome -- this will form the lip (bottom front) of the oven itself. Don't worry about an opening yet; you'll be carving that out in a few days, after the adobe has some time to dry out a little.
*Don't get too obsessed about the neatness of these curved hunks -- they may be more "blob" than "brick." The important thing is that the hunk-blob-brick needs to be 3" thick and moist enough that you can mold it as you're building, but dry enough that it doesn't dribble and slip down the side of the dome.

12 - Cutting Open the Front of the Oven
Do you have a pizza peel yet? Get one, and measure its horizontal width. This defines how wide you're going to want the opening of your oven.
Our favorite peel is 21" wide, so we wanted our oven opening to be 22-23" wide. Again, it's one of those things where smallest is best, because of heat efficiency, but it does need to be wide enough to get the peel in and out with ease.
TIMING IS IMPORTANT HERE -- you need the adobe dome to be dry enough that it won't collapse when you cut into it, but still moist enough to let you cut into it (truly dry adobe is like concrete).
When the adobe dome has dried a little -- the outside should be leathery but not sandy-dry yet, about 24-48 hours after the adobe dome was finished -- use a stick or pencil to trace out a mousehole-shape in the front of the adobe dome.
Now use a steak knife to saw into the outline of the mousehole-shape (including the line at the bottom). Be sure to cut through the thickness of the adobe layer -- the knife will plunge into sand on the other side of the dome wall. Slowly and gently pull out the mousehole-shaped adobe and put it to the side.
Using your hands, reach in and gently dig out the sand from inside the oven. Do this carefully and slowly. When you feel the newspaper layer, you know you've gotten all the sand away from that section of the oven. Keep removing sand until it's gone -- the oven will be hollow.
Give the oven a few days to dry. Then build a small fire on the lip of the oven and when it's going, shove the fire inside the oven. Keep adding wood (kindling-size) to this fire throughout the day to keep a low fire burning a long time -- this will speed the drying-out process!
13 - Cooking in the Oven
To start cooking, use several sticks of kindling to build a fire on the firebrick lip of the oven, where the bricks jut out in front.
Once the fire is going, use a long wood-handled instrument to shove the fire inside the oven -- we use a grass whip . It doesn't matter exactly what you use, but it needs to be long enough to stick into the back of the oven while keeping your hands well outside the oven, and it can't have a metal handle because it would get too hot to hold -- you'll be using it to shove glowing embers around.
You'll need to keep tending the fire constantly for about 30 minutes, feeding it more kindling and shoving the embers around to all parts of the oven (firebrick) floor. We recommend drinking beer and yakking with a friend while doing so.
We stuck a cheap (high-temp) metal thermometer
inside the oven in order to get the hang of gauging the temp of the oven. The numbers burned off the thermometer after a few fires, but now we know that after about 30 minutes, it's about 750 degrees, and it's ready for pizza!
Use the grass whip to push all the glowing embers/wood to the outer edges of the oven, forming a ring of fire and distributing the embers as evenly as is reasonable.
Use a short, damp-but-not-wet rag mop* to swipe the firebrick surface at center of the ring; that's where your pizza is going to go, and a quick swipe with the rag mop will keep the bottom of the crust from getting too ashy.
Meanwhile, at the pizza-construction operation, put about 3 tablespoons of dry corn meal on top of the peel and spread it evenly over the surface of the peel. Then -- and only then! -- put the pizza crust on top of the peel. Add toppings according to your favorite recipe, and take the pizza out to the oven, where your firetender has been faithfully feeding the fire.
Hand the uncooked pizza on its peel to the firetender. Standing with the peel between the lip and the center of the oven, the firetender gently shakes the peel so the pizza can be rustled on to the firebrick as close to the center of the oven as possible.
With the temp at 750 degrees, the pizza only takes about 2 minutes to cook, so be ready to pull that thing out of there and get it to where the hungry people are.
There's definitely a flow to this process, and you'll get the hang of it as you use your oven. We often use pizza night as an excuse to socialize with a small crowd (or vice versa), so coordinating the steady flow of pizzas can be tricky. What we've found works best is:
An hour before eating:


Once the fire is going, use a long wood-handled instrument to shove the fire inside the oven -- we use a grass whip
You'll need to keep tending the fire constantly for about 30 minutes, feeding it more kindling and shoving the embers around to all parts of the oven (firebrick) floor. We recommend drinking beer and yakking with a friend while doing so.
We stuck a cheap (high-temp) metal thermometer
inside the oven in order to get the hang of gauging the temp of the oven. The numbers burned off the thermometer after a few fires, but now we know that after about 30 minutes, it's about 750 degrees, and it's ready for pizza!
Use the grass whip to push all the glowing embers/wood to the outer edges of the oven, forming a ring of fire and distributing the embers as evenly as is reasonable.
Use a short, damp-but-not-wet rag mop* to swipe the firebrick surface at center of the ring; that's where your pizza is going to go, and a quick swipe with the rag mop will keep the bottom of the crust from getting too ashy.
Meanwhile, at the pizza-construction operation, put about 3 tablespoons of dry corn meal on top of the peel and spread it evenly over the surface of the peel. Then -- and only then! -- put the pizza crust on top of the peel. Add toppings according to your favorite recipe, and take the pizza out to the oven, where your firetender has been faithfully feeding the fire.
Hand the uncooked pizza on its peel to the firetender. Standing with the peel between the lip and the center of the oven, the firetender gently shakes the peel so the pizza can be rustled on to the firebrick as close to the center of the oven as possible.
With the temp at 750 degrees, the pizza only takes about 2 minutes to cook, so be ready to pull that thing out of there and get it to where the hungry people are.
There's definitely a flow to this process, and you'll get the hang of it as you use your oven. We often use pizza night as an excuse to socialize with a small crowd (or vice versa), so coordinating the steady flow of pizzas can be tricky. What we've found works best is:
An hour before eating:
- prep pizza dough if making it from scratch; make enough crust for approximately one medium pizza per person
- prepare toppings (dice veggies, shred or slice cheese, cook meat toppings, etc.) -- our friends and kids like to be put to work at this stage
- firetender leaves to go do his/her thing at the oven
- kitchen manager divides up dough and forms/tosses crusts -- this is kind of tricky, and your guests may not be able to get this right, so you'll either want to do it yourself or be prepared for some messed-up pizza
- raw crusts are put on corn-meal dusted, movable surfaces (a pizza peel, a cutting board, corrugated cardboard, etc.)
- each guest is assigned a raw crust on which to put the toppings of their choice. Don't let them pile the toppings too thick or the pizza will fall apart
- The firetender rushes inside to say the oven will be ready in about 5 minutes
- The first pizza is transferred from the movable surface to a pizza peel, and delivered to the firetender, who puts it in the oven for about 2 minutes.
- Meanwhile, the second pizza is transferred to another peel, and delivered to the firetender at the oven.
- The firetender removes the first pizza from the oven using the first peel, and a delivery person runs pizza and peel inside to the hungry crowd.
- Meanwhile, the firetender uses the second peel to get the second pizza going. The firetender and the delivery person will alternate peels each time.

Subscribe to:
Posts (Atom)